A roof is an essential component of a home that protects the interior from moisture. The type of roofing materials you choose depends on aesthetics, maintenance requirements and cost, along with the climate in your area.
During the roofing installation process, the contractor will lay an ice and water barrier, then underlayment. The underlayment prevents ice and water from damaging the plywood sheathing. For professional help, contact Pikesville Roofing.
Choosing the right roofing materials can have an enormous impact on the cost of a roof, its appearance and its ability to safeguard your home from the elements. While all the major roofing materials offer protection, the type you choose should reflect your budget, architectural style, local weather conditions and future maintenance needs.
Asphalt shingles are the most popular residential roofing material, striking a balance between affordability and performance. They are available in a variety of colors and are easy to install. They can be reinforced with fiberglass or organic materials without changing their appearance.
Clay tiles are an attractive and durable option for Mediterranean-style homes. They can be glazed or unglazed and come in a variety of shapes. This roofing material is heavy and requires extra reinforcement.
Concrete tiles are a lighter alternative to clay and provide a similar durability. They are also available in a variety of profiles to give your home a unique look.
Wood shingles and shakes can add a rustic or classic look to your house. They are typically made from cedar, redwood or pine and can be stained any color. Wood is not as long-lived as other roofing materials and must be treated regularly to prevent rot.
Other materials that can be used include a metal flashing to protect vulnerable areas, ice and water shield to promote waterproofing and a roof leak barrier. You should also have a roof ladder, safety harness and hammer.
Inspection
Whether you have a new roof or are replacing your old one, you want to know it was installed properly. This is the first line of defense for your home, and it can help protect against water damage, pest infiltration, and energy loss. A professional will perform a complete inspection before completing the work and afterward to ensure everything meets your standards.
After the roof is cleared of debris and materials, the roofing contractor will inspect the sheathing or roof decking, shingles, tiles (if applicable), and flashing. The flashing, which is usually aluminum or galvanized steel, is placed over joints on the roof to prevent water from seeping through. This includes the flashing around chimneys and vents, as well as the drip edge.
The roofer will also check for areas where a leak could enter the home, including shingle damage and cracked or missing mastic at vents, chimneys, and the gutters. In addition, they will inspect the interior of the house to look for walls that are damaged or in need of repair and make sure that appliances like stoves, refrigerators, washing machines, and dryers are working as they should. They will also look at the foundation of the home, if it is visible. They may also check for signs of termite or mold damage.
Underlayment
A secondary layer of protection, roof underlayment prevents leaking and moisture from getting into the sheathing and framing below. Without this, sheathing and other wood materials will quickly rot.
Typically made of felt paper or synthetic materials like IKO’s RoofGard-Cool Grey Synthetic roof underlayment, this material is rolled out and nailed down to the decking. Contractors start at the eave and work their way up the roof, with each row of underlayment overlapping the one beneath it by at least six inches. It’s especially important to cover the valleys with underlayment, as they direct water away from the house and need extra protection.
To ensure an even and complete seal, the underlayment should be nailed down so that its fasteners don’t protrude through the shingles above them. In some cases, contractors choose to use cork underlayment, which is eco-friendly and provides natural mold resistance.
Keep in mind that working on a steep or high roof requires specialized tools and equipment. It’s best to leave this kind of labor to the professionals. A safety harness and rope should be used for any roof work, no matter how short or long the task at hand is. If you’re planning on doing the work yourself, it’s worth investing in a fall protection kit from your local home improvement center for peace of mind and to protect against a potentially deadly fall.
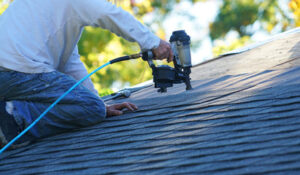
Shingles
Whether they’re made of asphalt, wood, clay or slate, shingles are the most easily recognizable element of a roof. They provide the necessary waterproof barrier and add to a home’s curb appeal. Shingles are available in a variety of colors, which can be mixed to create a distinctive look or to match an existing color scheme.
Before you begin installing shingles, make sure that the roof sheathing is clean and dry. Check the shingle packaging for suggested underlayment options and follow those instructions. Then, start by laying out the first course of shingles. The shingles should overlap the drip edge by about a half-inch.
Next, install the flashing around any protrusions on the roof, such as chimneys, skylights, vents and so on. The flashing should cover the seams and joints where these objects meet the roof and the shingles, to prevent leaks and damage.
Then, start laying out the shingle courses, spacing them so that each shingle is offset from the one above it and below it. Continue this pattern until you reach the ridge, where the shingles should be bent over and secured with roofing nails. Some roofs require a special ridge cap, which is often capped with a piece of slate. Shingles are very durable, and they should require little maintenance beyond a periodic inspection to make sure there is no damage or persistent issues like moss.
Flashing
Flashing is a thin material that professional roofers install to prevent water leaks in critical areas where the roofing materials butt up against wall penetrations, such as vents, chimneys and skylights. It can be made of metal (galvanized steel or aluminum) or flexible materials such as rubber, butyl rubber, Wakaflex, or even lead substitutes. Flashing is either exposed or concealed, depending on the situation. Exposed flashing is typically made of sheet metal, while concealed flashing is often fabricated from a flexible material that can be bent to fit around wall penetrations. For example, Colorbond roof flashing is a type of exposed flashing that is usually pre-painted galvanized steel or unpainted Zincalume® aluminum/zinc alloy-coated steel, while rubber, butyl rubber, or Wakaflex are examples of concealed flashings.
Metal flashings are fabricated from large sheets of metal, such as aluminum, and bent into various shapes to fit the different penetrations on a roof. A specialized tool, called a brake, is used to feed the sheet of metal into the tool and bend it into the required shape. Flashing profiles vary, so a custom piece of flashing is often needed for each job.
Some of the most common types of flashing include apron flashing, kickout flashing, pipe flashing and valley flashing. Apron flashing is installed at the base of the wall penetration or wall intersection and shaped like an L to fit the bottom of the structure. It forces water to drip away from the structure and into gutters, preventing it from entering the walls or the roof materials directly beneath it.
Installation
Roof installation isn’t just about laying new shingles; it’s also about installing and maintaining all the components that keep your home’s structure safe, dry, and functional. This includes flashing, ridge vents, gutters, and roof sheathing. It’s important that these pieces work together to protect your property from moisture, sun damage, and wind uplift.
A ridge vent or soffit vent is essential for proper attic ventilation. This helps prevent moisture from damaging the roof deck and insulation, regulates attic temperature, and reduces energy costs. It’s easy to install these vents when your roofing contractor is on the job.
In addition to protecting the eaves with drip edge flashing, your roofer will add valley flashing in areas where water is likely to collect. Other flashing is needed around chimneys, wood stove pipes, apron vents, and along hip roofs. It’s also a good idea to add ice and water sheathing in certain leak-prone areas.
Once the shingle installation is complete, your roofing contractor will clean up all debris from the site. They’ll remove trash, haul away old materials, and restore your property to its original condition. They’ll also do a final inspection of the work to make sure it meets all building codes and looks great. Taking these extra steps ensures that your home will remain protected and aesthetically pleasing well after the roofing crew leaves.